Video Conferences
OPTIS offers a built-in video conferencing feature that can easily connect parents and teachers right in their web browser with a siple click of a button. Although if you are more comfortable using a third-party video conferencing client like Zoom, Google Meet, Microsoft Teams, etc. then OPTIS can help you manage those conferences, as well.
Built-in Video Conferencing
OPTIS offers a built-in video conferencing solution which uses WebRTC technology. WebRTC is currently supported by Google Chrome, Mozilla Firefox, Safari, Opera and other Chromium-based browsers, in both their desktop and mobile app versions.
WebRTC support for these browsers is now built-in, an ideal solution that does not require any 3rd party components or plugins.
Enabling video conferencing
OPTIS' video conferencing is disabled by default, so you'll have to make sure it's been turned on:
Click Tools from the main menu.
Select Settings from the dropdown menu that appears.
Make sure the Enable built-in video conferencing and Allow parents to choose video conference options have been checked.
Click Continue to save the configuration settings.
Joining a Virtual Conference Room
When enabled, each appointment will automatically be assigned a Virtual Conference Room. Joining a Virtual Conference Room is as simple as clicking the Join Meeting button which appears in the right-hand column of each appointment row:
Click Schedules from the main menu.
Find a Teacher from the list of users.
- often it's easiest to use the Search for User feature to quickly find a user
Click the View Schedule button in the right-hand column of the user row.
Each appointment will have a row appended underneath which reads "A virtual conference room has been created...".

Click the Join Meeting button.
A new browser tab/window will open.
If prompted, grant permission to your web browser to access your Video Camera and Microphone.
Confirm the details of your appointment - you should see a message confirming the name of the teacher you are meeting with.
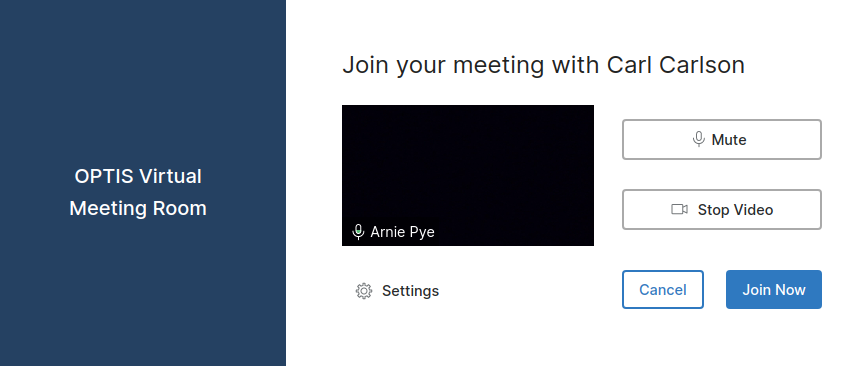
Click Join Now.
Inviting a user to a Virtual Conference Room
By default when a Virtual Conference Room is created the only paritipants are the Teacher and the Parent, but it's possible to invite more users to a meeting:
Click Schedules from the main menu.
Find a Teacher from the list of users.
- often it's easiest to use the Search for User feature to quickly find a user
Each appointment will have a row appended underneath which reads "A virtual conference room has been created...".

Click Invite User in the right-hand column of the row.
Complete the form with the Name and Email Address of the user you'd like to invite.
Click Save to finish inviting the user.
An email will be sent to the email address provided with a link which the user can use to join the meeting at the time of the appointment. This link will also be provided to you on the next screen; this link can be copied and shared. Keep in mind that each link is unique and only one user can join per link. If you need to invite multiple users you will have to repeat the above steps to generate more than one unique link.
Using a third-party video conferencing client (Zoom, Google Meet, etc.)
If you'd like to manage your video conferences manually using an external client like Zoom, Google Meet, Microsoft Teams, or any other, no problem - OPTIS can help.
OPTIS has a feature which allows Administrator or Teachers to add a note to an existing appointment. When a note is added to an appointment OPTIS will automatically send an email notification to the parent, and turn any URLs into clickable links so both the parent and teacher can open the meeting link from either their email or their OPTIS schedule.
Allow parents to schedule appointments as usual, and then using your external client, create video conferences and add them to the OPTIS appointments:
Adding a note to an individual appointment
In the case that each appointment requires a distinct video conference meeting link, you can add a note to specific appointment:
Click Schedules from the main menu.
Find a Teacher from the list of users.
- often it's easiest to use the Search for User feature to quickly find a user
Click the Add Note to Appointment button in the right-hand column of each appointment.
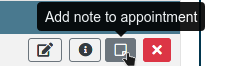
Enter the note along with the video meeting link into the window that appears and click Save.
Your page will reload and you will see a note has been appended to the appointment.

Adding a note to all appointments for a teacher in one step
In the case that a teacher will be using one video conference room for all appointments:
Click Schedules from the main menu.
Find a Teacher from the list of users.
- often it's easiest to use the Search for User feature to quickly find a user
Click Add Note to Appointments from the main action buttons.
Enter the note along with the video meeting link into the window that appears and click Save.
Your page will reload and you will see a note has been appended to all upcoming appointments.